
Hi, love. I’m Koya Webb, and today, I will be introducing you to Ashtanga and guiding you through an Ashtanga-inspired yoga flow.
I’m a certified 500-hour Ashtanga teacher, and I trained with Caroline Klebl in 2011 — who trained directly with the founder of Ashtanga Yoga, K. Pattabhi Jois., and I’ve been loving it ever since.
I respect the Ashtanga tradition deeply, and I love to create Ashtanga-inspired yoga routines. If you would like to follow a traditional Ashtanga class, I highly suggest following my teachers Caroline and Laruga.
I created this Ashtanga-inspired flow for beginners and for those who might not have enough time for the full primary series as it’s traditionally done. This is my own personal practice when I’m short on time or low on energy but I still want to get a nice flow in. But first, let’s talk about what Ashtanga is.
What Is Ashtanga Yoga?
“Ashtanga” is a Sanskrit word, meaning “eight limbs.” The term was first used by Indian sage Patanjali, known as one of the founders of yoga. In order to fully experience the benefits of yoga, he said that we must master eight limbs or practices in order to transcend into a higher reality.
Here are the eight limbs of Ashtanga yoga:
- Yamas — behavioral actions you should do
- Niyamas — behavioral actions you should not do
- Asana — physical postures
- Pranayama — breathing techniques
- Pratyahara — transcending the senses
- Dharana — concentration
- Dhyana — meditation
- Samadhi – transcendence into true self
Compared to other yoga practices, Ashtanga yoga is a bit more intense since it’s all about the continuous movement of these eight limbs. However, its fast pace helps us center our breathing and intensely concentrate on our movements, which can result in a meditative, transcendent experience.
Not only does Ashtanga benefit your mental, emotional, and spiritual states, but it also has several physical benefits as well. By practicing Ashtanga, you will become stronger, more flexible, and have much more stamina in your everyday life.
Now that you understand the fundamentals of Ashtanga, let’s begin this 60-minute Ashtanga-inspired flow. Feel free to go at your own pace and do whatever is comfortable for you. You can watch along with the video, or read along to get a feel for the routine. Let’s begin.
Beginning Vinyasa
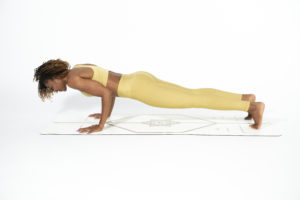
Take a deep breath — inhale and exhale. Inhale with your arms over your head and then exhale as you fold forward, placing your hands next to your feet on the floor. Now, step into plank position, engaging your lower core down to Chaturanga (a low plank).
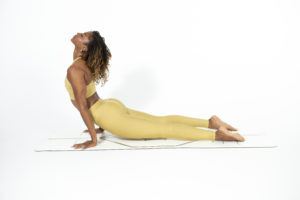
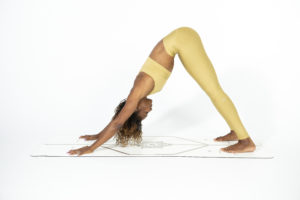
Next, inhale as you transition into Urdhva Mukha Svanasana (upward-facing dog), and exhale into an Adho Mukha Svanasana (downward facing dog). Take a moment to breathe deeply here — five deep breaths while spreading your fingers wide and engaging your core and thighs. As you breathe, imagine pressing the ground away from you, and keep your gaze on your naval or thighs.
Now, slowly come up high on your tippy toes, bend your knees, and step to the front of your mat. Inhale, lengthening your body halfway, and exhale, forward so that your hands are once again touching the ground beside your feet.

Now, reach your arms toward the sky and inhale on the way up. Exhale as you slowly move your hands down to heart center and then down by your side. Next, inhale again with your arms overhead, moving with the breath, and exhale down, stepping back into plank position. Make sure to engage your core before you lower down. Now, transition from plank position into an upward facing dog as you inhale and move into a downward facing dog as you exhale.
This is your Vinyasa — a series of movements that transition gracefully into one another. If you’re pressed for time, you can go straight to the downward facing dog. Just make sure that your weight is in your knuckles and fingertips rather than your wrists. Press your hips back and engage your core. Whenever you’re ready, come high on your tippy toes, still staying in a downward facing dog.
Now, bend the knees and step/hop to the front of your mat. Inhale as your body lengthens halfway and exhale forward with your hands beside your feet. Make sure to take your time — no need to rush. Take a deep inhale as you lift your arms up and over your head and exhale as you bring your hands back to heart center.
Whenever you’re comfortable with this flow, you can add more steps. If this is too complicated, you can always modify the flow so that you can make the practice easier. The important thing here is that you are listening to your body. Notice the parts of your body that are tight and loose. Pay attention to places where you need to strengthen and challenge yourself. Never judge yourself. Make whatever modifications you need and be consistent with what you choose.
Sun Salutation B
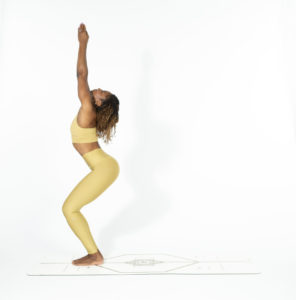
Now, move into sun salutation B. Inhale as you transition into chair pose, and exhale as you forward fold. Inhale while lengthening halfway, and exhale as you move into your Vinyasa that we talked about in the previous section (plank – upward facing dog – downward facing dog). Make sure that you move with your breath as you flow through these poses.
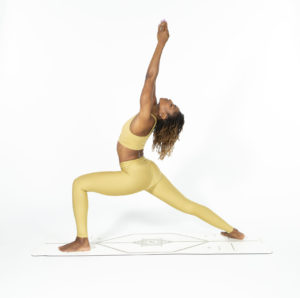
Transitioning out of the downward facing dog, bring your right foot forward between your hands as you exhale, and inhale with your arms up and overhead. Now, step the right foot back and flow through your Vinyasa again. As you return to downward facing dog, now step your left foot between your hands and move into the Warrior 1 pose as you inhale.
Again, notice how your body feels. What feels stiff? What feels good? What parts of the body could you engage more? Where can you release tension in your mind? What thoughts are holding you back from stepping into your highest self? Don’t rush through this process because when you take the time to take deep breaths, you’ll notice what parts of your body and mind need attention and care.
Let your breath and movement guide your meditation. Feel the connection in your body, mind, and soul. Continue in this flow for as long as you like. When you’re ready, return your hands to heart center as we transition into the next stage.
The Standing Series
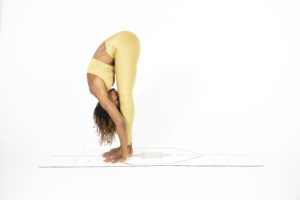
- Padahastasana
Start with Padahastasana (hand-under-foot pose) and wrap your peace fingers around your big toes. Inhale while lengthening your body, and exhale as you fold forward. Bend your knees as much as you need to, making that heart-to thigh-connection. As you do this, lengthen your body toward the ground through the hips and legs, and bend your elbows comfortably while tucking your chin into your chest.
Now, transition back into Padahastasana, with your body lengthening forward, and repeat the flow. Notice the spaciousness in your body and how it moves with your breath. As you focus on lengthening through your spine and the backs of your legs, release your thoughts. Let the stress and worries of life fade away. Now, inhale as you lengthen, and exhale and you move into a standing position with your feet together.
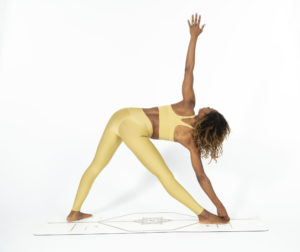
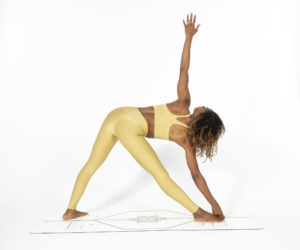
- Parivrtta Trikonasana
Next, turn your right foot toward the back of the mat and the left foot at a 45 degree angle. Wrap your peace fingers around your right big toe, and stretch your left arm toward the sky. You can gaze down at the ground for balance or look upward for a challenge. Engage your core by lengthening your body through the front leg, pressing the weight into your back hip. This is called Parivrtta Trikonasana — the revolved triangle pose.
Now, inhale coming up and switch sides, repeating the same flow. Make sure that your left foot is forward and that your right food is at a 45-degree angle. If you feel out of balance, you can always move your left foot more to the left and your right foot more to the right to give yourself a lower center of gravity.
Twist your waist slowly to transition to the left, to the right, and back again. You can repeat this process as many times as you’d like. If you struggle with this sequence, you can always bend the front knee as much as you need to so you can make contact with the ground. You can even place a book under your fingertips if you have trouble reaching the ground. Do what feels good in your body.
- Utthita Parsvakonasana
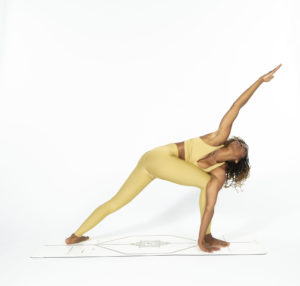
Now, let’s set up for Utthita Parsvakonasana (extended side angle pose). Start by standing at the front of your mat. Then, step your right leg toward the back of your mat with your left leg at a 45-degree angle. Bring the right arm down inside of your foot and bring the left arm over the head. Your right leg should be bent comfortably. Breathe deeply here, gazing up at your hand over your head.
When you’re ready, switch sides. Each time you do this pose, see if you can make your body longer — lengthening your body through your arms. Engage the core as you switch sides.
- Parivrtta Parsvakonasana
Next, let’s transition into Parivrtta Parsvakonasana (revolved side angle pose). With your right foot forward and your back foot at a 45-degree angle, place your right elbow on the outside of the left leg with your right hand touching the ground. You’ll have to really twist in order to achieve this pose perfectly. Now bring your left arm overhead. Now inhale as you move your body up and exhale as you twist to stretch the other side.
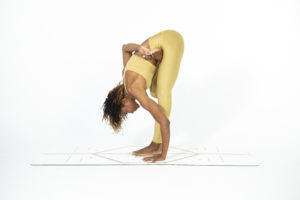
- Prasarita Padottanasana
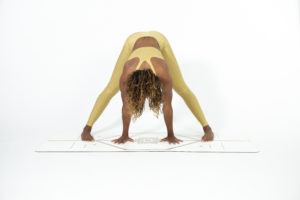
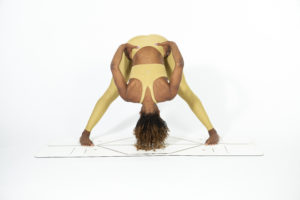
Preparing for Prasarita Padottanasana (wide legged forward bend), place your feet far apart and put your hands on your hips. Now slowly bend forward, moving your hands to the ground. Inhale as you lengthen your body and exhale as you fold forward. Make sure that your toes are facing inward and that your heels are facing outward. Your feet should be parallel with your hands, and the crown of your head should be toward the ground. Lengthen your body through the neck and spine, and release tension.
Now slowly bend your knees, bring the hands to the head, and move your body up. Now stretch your arms out to the side and exhale, bring them back to the waist. Next, bend forward again, but keep your elbows touching each other behind the back. Find stillness in your body. Gradually lift your torso back up and this time, hold your hands behind your back and repeat the same process. Lastly, bend your torso forward and wrap your peace fingers around your toes.
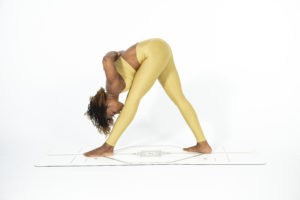
- Parsvottanasana
When you’re ready, return to the front of your mat to prepare for the pyramid pose. Now, step a little bit wider than hip distance with your right foot back. Place your arms behind your back and put your hands in a prayer pose. Then extend your torso forward over the front leg. Inhale lengthen and exhale, melting the heart onto the thigh.
Inhale as you bring your torso back up and switch sides. Make sure that your hips are square with the front of the mat. Find the ocean breath by breathing in and out through the nose, and let stillness envelop your body.
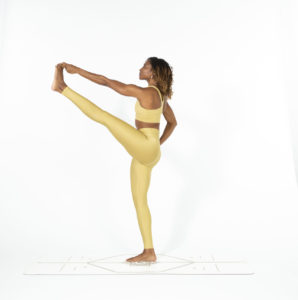
- Utthita Hasta Padangusthasana
Step to the front of the mat. Bend the right knee and wrap your peace fingers around your big toe with your right hand. While still holding your toe, extend the right leg out in front of you. Lengthen here as you engage the core, and relax the shoulders away from the ears. Keep your left hand on the hip, and slowly fold forward. Now bring the right leg to the right as you turn the head to the left. Take your time here as it’s easy to lose balance. If you do lose balance, give yourself grace and bring that leg back to the center. When you’re ready, you’ll do that same routine with your left leg.
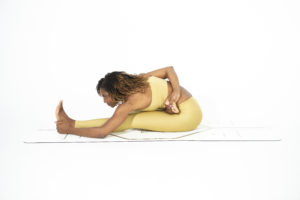
- Ardha Baddha Padmottanasana
Now moving onto Lotus pose — while standing, grab your right leg with your right hand while it’s wrapped behind your back. Next, bend your torso forward and place your left hand on the ground, bending that standing leg as much as you need to. When you’re ready, switch sides.
To give yourself a challenge, perform this pose with one of your knees folded, with the foot on the opposite thigh. You’ll feel multiple parts of your body stretching all at once — find the place that feels most comfortable to you. Trust your body.
- Utkatasana to Bakasana to Vinyasa
The next pose is a challenging one, but I believe in you. You inhale with your arms up overhead, straighten your legs, and exhale forward fold. You can do an optional crow pose here by placing your hands on the ground and your knees on your biceps. After finding the crow, flow back into your Vinyasa, ending in a downward facing dog. This sequence finishes our standing series.
Seated Series
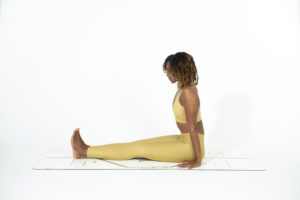
- Dandasana
Stead one the mat, place your hands beside your hips, and stretch your legs out in front of you, side by side. Press down through your hands and lengthen through your spine. Slowly bring your hands forward and wrap your peace fingers around your big toes. Now fall forward, bending your elbows at your side. I like to release my neck and let my head softly down on my shins. Now exhale as you lengthen your body upward. Next, try to reach forward and bring your hands around your feet or even a little bit forward. Bend your knees as much as you need to. Relax the heart on the thighs and lengthen your legs with each breath.
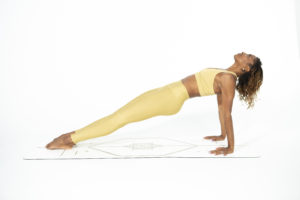
- Purvottanasana and Padmasana
Now onto Purvottanasana — lengthen your entire body towards your legs and place your arms behind your shoulders with your palms facing inward. Press down through the hands so that your body straightens into an incline.
Next, let’s move into a half-Lotus pose. Bend the left leg inward onto the right thigh, and bend forward, and do the same with the right leg. To end, cross your ankles and bring your knees close to your heart and lift up your body with your hands, which should be on either side of your hips. I do many more variations of this pose, so watch the full videos to see my routine.
- Triang Mukhaikapada Paschimottanasana (Hurdler Stretch)
Bring your right leg back behind you, folded at the knee, and keep your left leg straight. Lengthen and exhale. Hands can be beside your legs here, or you can wrap your arms around your foot. Breathe deeply and find stillness in the pause. Now switch to the other side, melting your heart over the right thigh.

- Navasana
For the Navasana pose, start with crossed ankles and arms hugging your knees close to your chest. Now, letting go of your knees, slowly lift the legs upward and place your hands on either side. This one can be hard to hold, but it does amazing work for your core.

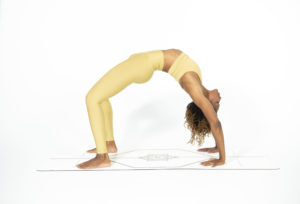
- Setu Bandha Sarvangasana
You can make this pose as challenging or simple as you want. To start off with a simple bridge pose, relax your body down to the floor, bending your knees, and bringing them to your hands which should lay on either side of your body. Now, lift your torso up into a bridge. If you want to go deeper, you can place your hands behind your ears and push your body upward into a curve. Again, do whatever is comfortable for you. There are several variations of the bridge pose, all with different levels of difficulty — make sure to watch the video to see all of my variations and find the one that is right for you.
Finishing Poses
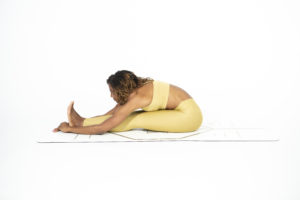
To finish off this routine, let’s move into a Paschimottanasana (seated forward bend). Inhale, lengthen, and then exhale.
Now transition onto your back, bend your knees, and grab your toes with your peace fingers for Ananda Balasana (happy baby pose). Gently rock from side to side, like a happy baby in the crib.
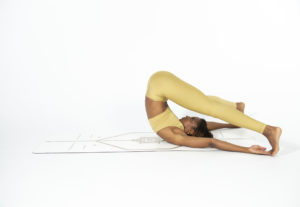
If you’re up for a challenge, extend your legs behind your head and lay your arms down facing forward for Halasana (plow pose).
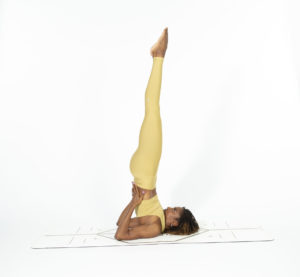
Next, move into Salamba Sarvangasana (shoulderstand) by placing your arms on your lower back for support and lifting your legs straight up into the air.
Now, let’s return back to the ground, arching the shoulders back, and transition into Matsyasana (fish pose). Relax your head back and lift the heart. You can complicate this pose by bending your knees or even straightening out your legs in the air with your arms stretching forward. When you’re ready, release the pose, and grab your knees together with your arms and rock back and forth to prepare for your headstand.
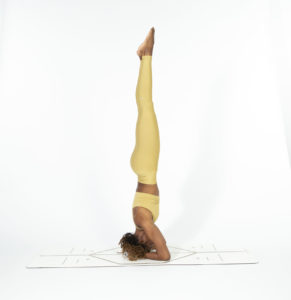
Put the top of your head on the ground and place your fingers against the head. Bring your right knee and left knee up to your chest as you slowly straighten the legs and engage.the core. If you need help, find a wall for support. Take your time. Make sure your elbows stay put and don’t slide out. Your legs may want to move forward or back, but do your best to keep them together so you can stabilize them. To engage the core even further, slowly move your legs up and down at different angles. Flex and point the toes, and let your shoulders, elbows, and head be your grounding points.
This is a very intense pose on the body, so to end, let’s transition into a restful Balasana (child’s pose). Wrap your arms around your knees and breathe into your shoulders. Relax your body and your mind — you deserve it.
In the video, I end with a seated Vinaysa, so make sure to watch that if you want to continue the exercise. Whatever you choose to do, make sure you allow your body to settle. I like to take a deep inhale and bring my hands to heart center. I then bring my hands to my third eye for divine alignment and clarity of thought, and lastly, I bring my hands to my lips for divine speech.
For the full Ashtanga-inspired routine, make sure to watch the video — you can even do it along with me. If you enjoy it, please let me know on Instagram, @koyawebb, and make sure to subscribe to my YouTube channel to see more of my yoga flows.
I hope you enjoyed reading this post and learning more about Ashtanga and this inspired flow. May your speech be in alignment with your purpose. I love you all. Namaste.

***
Are you a Wellness Entrepreneur who wants to expand your business and impact? If so, I want to encourage you to enroll in this exclusive 4-week course led by myself and special guest Arianne Traverso. In this course, Arianne and I give our insight on the world of wellness entrepreneurship, how to price your courses, and how to build a strong environment of self-love and health in your space.
Listen to this podcast episode with Laruga Glaser to learn more about the restorative properties of yoga.


Comments +